Wednesday, November 13, 2013

Google Story Builder

Google Story Builder
Create an Animated Story Easily With Google Docs!


Using Google's Story Builder App is very easy!
  1. Go to the Story Builder web site at http://docsstorybuilder.appspot.com/
  2. Click the red "Get Started" button.
  3. Add the characters to your story. You may add up to 10 characters to your story.
  4. Add each character's dialogue to the box. Write your story as if they are having a short and funny conversation. You are only able to add 10 lines to your story, so think about what you want to say before you write your lines. Think about how you can say everything in only 10 sentences. Enter each line of dialogue in the box. Don't forget to select the name of the character in your story who will be speaking that particular line.
  5. Give your story a title.
  6. Click the "Add Music" button if you wish to add music to your story.
  7. Click the "Preview" button to preview your new animated story.
  8. Add your first name to your story.
  9. Click "Get Shared Link" by highlighting the link and pressing Command + S so that you can share your story with others...it's that easy!!
After you have created your story:
  1. Create a new document in your Google Drive, and name it "Story Builder"
  2. Title your document, "Story Builder"
  3. Center your title at the top of your document
  4. Write the title of your new Story Builder story
  5. Highlight the title
  6. Click the link button at the top (looks like a chain link)
  7. Paste your story link in the URL box (Command + C)
You now have a permanent link to your story!

Labels: , ,

Friday, September 06, 2013

Logging In To Our SAUSD "Google Apps in Education" Accounts

Today we are going to learn how to log in to our
SAUSD Google Apps for Education accounts!

Your Google account is an online account that gives you access to many different applications you can use to complete projects for your classes. When you create something using your Google account, you are able to access it from any computer, anywhere, at any time. One of the best features of your Google account is the ability to collaborate with your teacher and other students on the same project!

Some of the tools are office suite/productivity applications and are used primarily for typing and presenting information. These are Google Drive (formerly called "Docs"):
Other applications are for online publishing such as:
  • Sites (for creating websites)
  • Blogger (for creating blogs)
  • Calendar
You will use this account until you graduate from high school in the Santa Ana Unified School District!

How to log in:
  1. Open any web browser
  2. Go to the Spurgeon website at www.spurgeoncougars.us
  3. Click on the SAUSD Google Apps link:
  4. Sign in to your Google account
    1. Name = StudentID#
    2. Password = Your Date of Birth (MMDDYYYY)

You are now signed in and can now begin using your account!

  
To use your account, click on any of the items in the black Google menu bar at the top of the Google home page. Some of the items you will use frequently are:
  • Google Drive is where your office suite items such as documents, presentations, spreadsheets, forms, or drawings are housed.
  • Google Calendar displays calendars you have created, and any calendars that have been shared with you.
  • You Tube video-sharing website allows you to personalize your account with "channels".
  • Google Play is for books, magazines, media, games & Android apps.
How to log out:
  1. Return to the Google home page or your Google Drive page
  2. Click on your name in the upper right hand corner
  3. Drop down and click on "Sign Out"
Remember!
Don't forget to sign out of you Google account and disconnect your Google Chrome account whenever you leave your computer to protect your privacy.

Labels: ,

Monday, April 08, 2013

Let's Create a Presentation with Google Slides

This week you will create an autobiographical presentation to share with the class! 


Topic:
  • Your Autobiography
Number of Slides:
  • 10 slides =  5
  • 8 slides   =  4
  • 6 slides   =  3
Slide Format Requirements:
  • Each slide a title must have a title.
  • Each slide must have an image. Each image must be related to the content on that slide.
  • Use a "bulleted list" or a paragraph to display information.
  • You may change the font, color, and type of your text.
  • You may add a background theme.
  • You must add a transition to each slide.
  • You must animate at least one object in your slide stack.
  • This is a Zero Errors project. That means that you will check for all spelling and grammatical errors in your presentation before sharing with others.
Slide Information:
  • Slide 1: Introduction
    • Write "My Autobiography" in the title box
    • Write your name in the subtitle box
  • Slide 2: Background Information:
    • When were you born?
    • Where were you born?
    • Where did you grow up?
    • Where did you attend elementary school?
    • What school do you attend now?
    • What grade are you in now?
  • Slide 3: Family Information:
    • Who are the members of your family?
    • Where do they attend school?
    • What are their occupations (what do they do)?
  • Slide 4: What are your favorite activities?
    • Describe what activities you like to do and why.
  • Slide 5: What is your favorite food?
    • Describe what you like to eat.
  • Slide 6: Where do you want to travel?
    • Describe the place.
    • Explain why you want to go to this place?
  • Slide 7: What are some of your successes at Spurgeon?
    • Describe them.
    • Explain why you were successful.
  • Slide 8: Where do you want to go to high school?
    • Describe the school.
    • Explain why you want to attend this school.
    • Explain what you would like to study.
  • Slide 9: Where do you want to go to college?
    • Describe the school.
    • Explain why you want to attend this college.
    • Explain what you would like to study.
  • Slide 10: What do you want to do for a career?
    • Describe your future career.
    • Explain why you think this career will be interesting.
How to Create a Presentation with Google Slides
  1. Log in to your Google Apps account.
  2. Click create a "New Presentation"
  3. Click "Cancel" to NOT choose a theme (you may add it later).
  4. You are able to type in the text boxes by clicking inside the box.
  5. You are able to change the font, size, style, and color of the text in a text box.
  6. Everything on a slide is an "object" that can be resized or rotated or moved by clicking on the object.
    1. Grab the object by clicking on a side of the object (to get the criss-cross symbol).
    2. Rotate an object by turning the blue circle at the top of the box.
    3. Resize an object by clicking on a corner.
  7. Click the red "+" sign to add a new slide.
  8. Click "Tools + Research" to search for images on the web. Drag them into your document.
  9. Click "Insert + Image + Upload" to add an image from your computer.
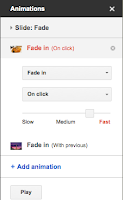
  10. To animate an object or to add transitions between slides, hold down the "control" key, click on an object in your slide, and select "animate". The animate pane will appear on the right side of your slide and you will be able to add slide transitions or animate an object.

Labels: , , , ,

Monday, March 25, 2013

Google Story Builder in Groups

Google Story Builder in Groups!


Today you will work in your student group to create a new story with Google's Story Builder. In groups of three, you will each open your Google doc entitled "Story Builder." Only one member of your team will open the Google Story Builder program. Your team will create a story, then copy and paste the link to your story in your Google "Story Builder" doc to share with Ms. Kline and the class at a later date.

Remember, using Google's Story Builder App is very easy!
  1. Go to the Story Builder web site at http://docsstorybuilder.appspot.com/
  2. Click the red "Get Started" button.
  3. Add the characters to your story. You may add up to 10 characters to your story.
  4. Add each character's dialogue to the box. Write your story as if they are having a short and funny conversation. You are only able to add 10 lines to your story, so think about what you want to say before you write your lines. Think about how you can say everything in only 10 sentences. Enter each line of dialogue in the box. Don't forget to select the name of the character in your story who will be speaking that particular line.
  5. Give your story a title.
  6. Click the "Add Music" button if you wish to add music to your story.
  7. Click the "Preview" button to preview your new animated story.
  8. Add your first name to your story.
  9. Click "Get Shared Link" by highlighting the link and pressing Command + S so that you can share your story with others...it's that easy!!

Labels: , , ,

Tuesday, March 19, 2013

Choice Journal

Choice Journal Using Expository Writing

During class, you will occasionally have the opportunity to choose your activity. During these "Choice Activities" you will use expository writing to explain how or what you are working on.

Last week you worked with the entire class to create the ground rules for the "Choice Journal" project. You now have a list of what is expected when you choose an activity in Ms. Kline's class. Remember, you must have your "Choice Journal" document open during the activity. You must also keep your "Choice Journal Rules" open as well, but this document can stay in the background.

You will describe and explain the activity by answering the following questions:
  1. Background: What is the activity about?
  2. Setting: Where does the activity take place?
  3. Characters: Who are the characters in the activity?
  4. Purpose: What are you trying to achieve with this activity?
  5. Interest: Why do you like to do this activity?
  6. Instructions: How do you do this activity?
  7. Tips and Tricks: What tips to you have for other people doing this activity?
You must write in your Choice Journal every time you play!

At the end of the period, you must also complete this short form. Log in to your SAUSD Google Apps account so that you can see it.

Labels: , , , ,

Monday, March 18, 2013

Google Storybuilder

Google Story Builder
Create an Animated Story Easily With Google Docs!

While Ms. Kline attended the "Computer-Using Educators" annual Spring conference in Palm Springs this weekend, she learned how to use a really neat new tool from Google that you can use to quickly and easily create an animated story with a Google Doc.


Using Google's Story Builder App is very easy!
  1. Go to the Story Builder web site at http://docsstorybuilder.appspot.com/
  2. Click the red "Get Started" button.
  3. Add the characters to your story. You may add up to 10 characters to your story.
  4. Add each character's dialogue to the box. Write your story as if they are having a short and funny conversation. You are only able to add 10 lines to your story, so think about what you want to say before you write your lines. Think about how you can say everything in only 10 sentences. Enter each line of dialogue in the box. Don't forget to select the name of the character in your story who will be speaking that particular line.
  5. Give your story a title.
  6. Click the "Add Music" button if you wish to add music to your story.
  7. Click the "Preview" button to preview your new animated story.
  8. Add your first name to your story.
  9. Click "Get Shared Link" by highlighting the link and pressing Command + S so that you can share your story with others...it's that easy!!
After you have created your story:
  1. Create a new document in your Google Drive, and name it "Story Builder"
  2. Title your document, "Story Builder"
  3. Center your title at the top of your document
  4. Write the title of your new Story Builder story
  5. Highlight the title
  6. Click the link button at the top (looks like a chain link)
  7. Paste your story link in the URL box (Command + C)
You now have a permanent link to your story!

Labels: , ,

Thursday, September 20, 2012

Today you will use the skills you learned about how to create a Google document, and you will create an invitation to Spurgeon's Back to School Night.

  1. Login in to your Google account from the www.google.com web page.
  2. In the black Google menu bar, click on "Documents" or "Drive". You should have already upgraded from "Documents" to "Drive", but you may do so now by following the prompts.
  3. Click Create, and drop down to document to create a new document in your Drive folder.
  4. Name the document "Back to School Night Invitation".
  5. Use the "Center Alignment Tool" to center the information for you invitation. 
  6. Please add the following information:
    1. Date: 9/20/12
    2. Time: 6:00 - 8:00 PM
    3. 6th Grade Orientation: 5:00 - 6:00 PM
    4. ASB Pizza Sale: 5:00 PM - 6:00 PM
    5. Performances by Spurgeon's Choir and Orchestra
    6. Visit with teachers
    7. Treats in Ms. Kline's class
    8. Family photos in Ms. Kline's class
    9. Show off the new building and 2nd floor modernization
    10. Add your photo
    11. Add a photo of Spurgeon
  7. Follow the directions from your first Google document if you need help.
  8. Have Fun!

Labels: , , , ,

Thursday, August 30, 2012

Your First Google Doc!

Today you will use the skills you learned about how to create a Google document, and you will finish working on your "About Me" document.

  1. Login in to your Google account from the www.google.com web page.
  2. In the black Google menu bar, click on "Documents" or "Drive". If you have not upgraded from "Documents" to "Drive" yet, do so now by following the prompts.
  3. Click on  the "About Me" document you created yesterday in your Drive folder
  4. Finish the assignment as described in yesterday's post.

Labels: , , ,

Wednesday, August 29, 2012

Creating a Document with Google Apps

Today we are going to learn how to create a document with our
Google Apps for Education accounts!

Google Drive is where you will begin using the office suite applications in Google Apps. In Google Drive, you will find an easy-to-use word processor to create and edit written documents.

To create a document in your Google Drive account:

  1. Login in to your Google Apps account on the Google home page www.google.com using most web browsers.
  2. Click "Drive" in the black Google menu bar at the top of the screen.
  3. Click the red "Create" button on the left side of your Drive account.
  4. Drop down to and click on "Document".
  5. Click on "Untitled Document" and type in the box to rename your document.
  6. Compose and edit your document as with any word processing software.
  7. Google Docs are automatically saved.

Let's practice by creating and editing a new document!
Add Image Icon
  • Create a new document as detailed above.
  • Rename the title to "About Me".
  • Type your name at the top of the page.
  • Click the "Align center" button to center your name as a title.
  • Highlight your name and change the font, change the size to 24, and change the "Text color" as well.
  • Press return two times.
  • Click the "Align left" button to begin typing on the left side of the document.
  • Type five sentences about yourself (grade, school, classes, future, favorite stuff, etc.).
  • Highlight and change the font of the five sentences, change the color to black, and the size to 12.
  • Insert a photo of yourself by clicking on the image icon, then clicking "Select a file from your webcam".
  • When you are happy with your photograph, click "Take snapshot".
  • Move your photo to the bottom of your document.
  • You may also add a photo of your favorite thing, but don't forget to cite your resource, it's easy to do if you use Google docs Reference tool.
  • Great job!

Labels: , , , ,

Tuesday, August 28, 2012

Login to Your Google Apps Account

Today we are going to learn how to log in to our SAUSD
Google Apps for Education accounts!

Your Google account is an online account that gives you access to many different applications you can use to complete projects for your classes. When you create something using your Google account, you are able to access it from any computer, anywhere, at any time. One of the best features of your Google account is the ability to collaborate with your teacher and other students on the same project!

Some of the tools are office suite/productivity applications and are used primarily for typing and presenting information. These are Google Drive (formerly called "Docs"):
Other applications are for online publishing such as:
  • Sites (for creating websites)
  • Blogger (for creating blogs)
  • Calendar
You will use this account until you graduate from high school in the Santa Ana Unified School District!

How to log in:
  1. Open any web browser (today we will use Google Chrome)
  2. Go to the Google home page: www.google.com
  3. Sign in to your Google account
    1. Name = Student ID#@sausd.us
    2. Password = Your Date of Birth (MMDDYYYY)
You are now signed in and can now begin using your account!
  
To use your account, click on any of the items in the black Google menu bar at the top of the Google home page. Some of the items you will use frequently are:
  • Google Calendar displays calendars you have created, and any calendars that have been shared with you.
  • You Tube video-sharing website allows you to personalize your account with "channels".
  • Google Play is for books, magazines, media, games & Android apps.
  • Google Drive is where your office suite items such as documents, presentations, spreadsheets, forms, or drawings are housed.
    • If your menu bar says "Documents" instead of "Drive" do the following steps to convert to Google Drive which allows you 5GB of free storage:
      1. Click "Get Started with 5GB"
      2. Enter the CAPTCHA letters in the box
      3. Click "I Agree"
      4. Your account is now converted to Google Drive
How to log out:
  1. Return to the Google home page or your Google Drive page
  2. Click on your name in the upper right hand corner
  3. Drop down and click on "Sign Out"
Remember!
Don't forget to sign out of you Google account and disconnect your Google Chrome account whenever you leave your computer to protect your privacy.

Labels: , , , , , , , , , , , , ,